WordPressのブロックエディッタをカスタマイズ-カスタムスタイル編
こんにちは、HIROです。
最近、WordPressのブロックエディタ(グーデンベルグ)を使いこなすためにブログを始めました。
ブロックエディタは慣れると非常に直感的で、デザインの自由度も高いですね。
私は、さらに便利に使えるようにブロックエディタのカスタマイズを試してみることにしました。
ブロックエディタの魅力は、コンテンツをブロック単位で管理できる点や、ビジュアルを自由に調整できる点です。
しかし、もっと効率化できないかと考え、最近は独自のボタンを追加するカスタマイズに挑戦しています。
この記事では、その方法を簡単にご紹介します。
皆さんはブロックエディタをどのように活用していますか?独自のカスタマイズを施すことで、より快適に使えるようになるので、ぜひ試してみてください!
この記事を読むと、カスタムスタイルブロックの追加ができます
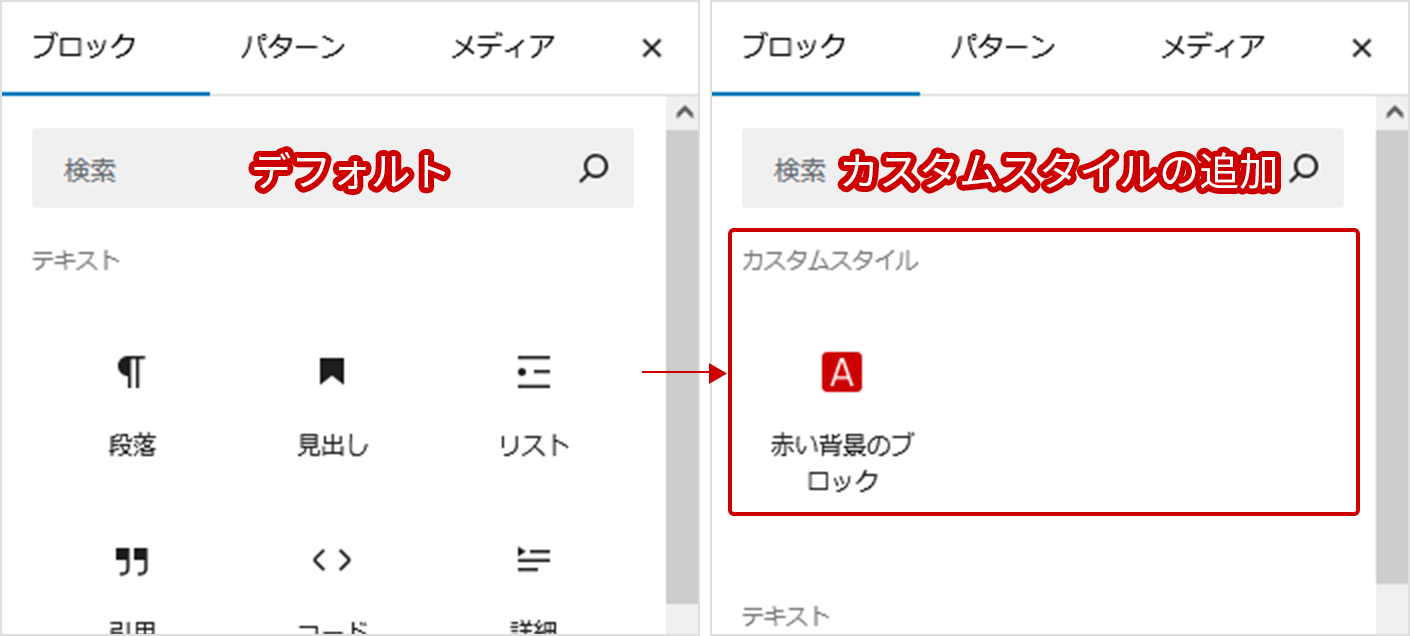
この記事を読むと、上記画像のようなカスタムスタイルのブロックの追加ができます。
恐らく、記事を読んでいただければ追加で様々なカスタムスタイルブロックの追加も容易にできるようになるかと思います。
事前準備として
これはわたしだけかもしれませんが、WordPressのfunctions.phpってコードに記述が多くなって見にくくなりませんか?
そんなときは、機能ごとにfunctions.phpを分解するとコードがすっきりして、対象のコードが探しやすくなりますよ!
- functions.php:全体の機能用
- admin-functions.php:管理画面の機能用
- cms-functions.php:CMSの呼び出しやページャー用
- seo-functions.php:SEOに関する機能用
- etc…
こんな感じでfunctions.phpをまとめて作業をしています。
<?php
require_once(get_template_directory() . '/functions/admin-functions.php');
require_once(get_template_directory() . '/functions/cms-functions.php');
require_once(get_template_directory() . '/functions/seo-functions.php');
require_once(get_template_directory() . '/functions/gutenberg/gutenberg.php');
etc...
で、本日は「gutenberg.php」のカスタマイズをしてみましょう。
ブロックエディッタのカスタマイズ準備
ブロックエディッタに追加したい要素やスタイルは、ブログを運営していると多々あるかと思います。
この「WordPressのブロックエディッタをカスタマイズ-独自のボタン追加」では、ブロック要素の追加方法を説明します。
準備するファイルは以下の通りです。
試してみる方は、ファイルパスさえ正しければ動くはずなので、
ご自身の環境に合わせてパスを変更してくださいね。
gutenberg用のPHPファイル:1個
WordPressのfunctions.phpにincludeして、ブロックエディッタに設定を反映させるためのファイルです。
/wp-content/themes/テーマ名/functions/gutenberg/gutenberg.php
gutenberg用のJavascriptファイル:2個
gutenberg.phpでjsを読み込み、ボタンを表示させたりするためのファイルです。
ここでは、ブロック要素用とインライン要素で分けて管理します。
custom.jsは要素追加以外とします。
/wp-content/themes/テーマ名/functions/gutenberg/js/custom.js
/wp-content/themes/テーマ名/functions/gutenberg/js/custom-block-add-style.js
gutenberg用の画像ディレクトリ
画像ディレクトリでは、ブロック要素やインライン要素のボタンに対して表示させるアイコンを管理するディレクトリとしています。
/wp-content/themes/テーマ名/functions/gutenberg/icon/
gutenberg用のcssファイル:1個
上記javascriptで生成されるボタンや、ボタンをクリックした後に反映させるスタイル等を設定するファイルです。
/wp-content/themes/テーマ名/functions/gutenberg/css/style.css
ひとまずこれくらい準備して頂ければOKです。
では、各ファイルの記述方法を紹介していきます!
gutenberg用のPHPファイル
ブロックエディタにJavaScriptとCSSを読み込ませる
まずはじめに、gutenberg.phpの記述です。
まずは、GutenbergブロックエディタにJavaScriptとCSSを読み込ませる手順を解説します。
この段階では、ボタンなどの機能を実装する前に、ブロックエディッタに必要なスクリプトやスタイルを適切に読み込ませる設定を行います。
<?php
/*========================================================
グーデンベルグにcssとjsを追加
========================================================*/
function add_my_assets_to_block_editor()
{
    wp_enqueue_style('block-style', get_stylesheet_directory_uri() . '/functions/gutenberg/css/custom-block.min.css');
    wp_enqueue_script('block-custom', get_stylesheet_directory_uri() . '/functions/gutenberg/js/custom.js', array(), "", true);
    wp_enqueue_script('gd-custom-block', get_stylesheet_directory_uri() . '/functions/gutenberg/js/custom-block-add-style.js', array(), "", true);
}
add_action('enqueue_block_editor_assets', 'add_my_assets_to_block_editor');
必要なファイルをここで読み込みます。
上記コードで注意する点は、
- ‘block-style’
- ‘block-custom’
- ‘gd-custom-block’
これらはIDとなるので重複はNGです!
重複すると読み込みませんのでご注意ください。
カスタムブロック追加の準備
つぎに、カスタムブロックの項目を作ります。
既存の「テキスト」や「メディア」などに追加する事も可能です。
<?php
/*========================================================
新しいカスタムスタイルを追加
========================================================*/
function add_custom_block_category($categories)
{
    // 新しいカテゴリーを先頭に追加
    array_unshift($categories, array(
        'slug'  => 'custom', // カテゴリのスラッグ
        'title' => __('カスタムスタイル', 'Gutenberg-Custom-Style'), // カテゴリの表示名
        'icon'  => null,
    ));

    return $categories;
}
add_filter('block_categories_all', 'add_custom_block_category', 10, 1);
gutenberg用のPHPファイルのまとめ
/wp-content/themes/テーマ名/functions/gutenberg/gutenberg.php
こちらの「gutenberg.php」にブロックエディタにJavaScriptとCSSを読み込ませるとカスタムブロック追加の準備で記述したコードを書いてサーバーにアップします。
この段階ではカスタムスタイルブロックは表示されませんので早まらないでくださいね!
gutenberg.phpの全コード
<?php
/*========================================================
グーデンベルグにcssとjsを追加
========================================================*/
function add_my_assets_to_block_editor()
{
    wp_enqueue_style('block-style', get_stylesheet_directory_uri() . '/functions/gutenberg/css/custom-block.min.css');
    wp_enqueue_script('block-custom', get_stylesheet_directory_uri() . '/functions/gutenberg/js/custom.js', array(), "", true);
    wp_enqueue_script('gd-custom-block', get_stylesheet_directory_uri() . '/functions/gutenberg/js/custom-block-add-style.js', array(), "", true);
    wp_enqueue_script('gd-custom-inline', get_stylesheet_directory_uri() . '/functions/gutenberg/js/custom-inline-add-style.js', array(), "", true);
}
add_action('enqueue_block_editor_assets', 'add_my_assets_to_block_editor');

/*========================================================
新しいカスタムスタイルを追加
========================================================*/
function add_custom_block_category($categories)
{
    // 新しいカテゴリーを先頭に追加
    array_unshift($categories, array(
        'slug'  => 'custom', // カテゴリのスラッグ
        'title' => __('カスタムスタイル', 'Gutenberg-Custom-Style'), // カテゴリの表示名
        'icon'  => null,
    ));

    return $categories;
}
add_filter('block_categories_all', 'add_custom_block_category', 10, 1);
おまけ:各jsとcssがブロックエディッタに読み込まれているかの確認方法
各jsとcssがブロックエディッタに読み込まれているかの確認は「開発ツール」使用します。
まず、ブロックエディッタの画面を開いた状態で「開発ツール」を開きます。
ChromeやFierfoxでは「F12」で「開発ツール」が開きます。
当記事では、Fierfoxの例です。
開発ツールのネットワークで確認
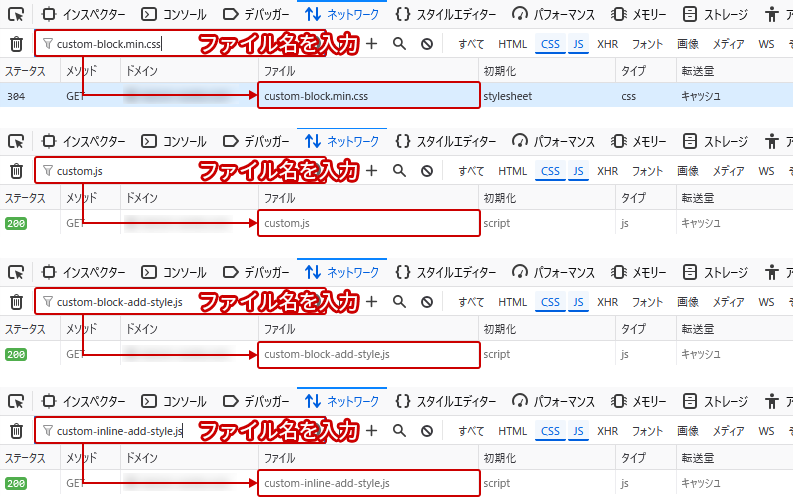
「開発ツール」のネットワーク画面を開いて、「F5」でページを再読み込みします。
次に、検索窓に各jsとcssのファイル名を入力すると以下のように表示されます。
もし表示されない場合は404などと表示されます。
404などと表示されて読み込まれていない場合は、「ブロックエディタにJavaScriptとCSSを読み込ませる」のパスが間違っている可能性があります。
カスタムスタイルブロックの準備
この「カスタムスタイルブロックの準備」の章では、先ほどの「gutenberg用のPHPファイル」で読み込ませたjsとcssファイルに記述して行きます。
とその前に、「この記事を読むと、カスタムスタイルブロックの追加ができます」で紹介した画像にもある、カスタムスタイルブロックに表示させるアイコンの作成から行きます。
カスタムスタイルブロックに表示させるアイコンの作成
このアイコンのサイズは、縦横24pxのsvg画像です。
サイズが小さいので、デザインされる際は細かくなりすぎず且つわかりやすいアイコンを作ってみてください。
私はIllustratorで作成していますが、この記事での作成方法は割愛させていただきます。
Illustratorを持ってないよ!という方はデフォルトで用意されているアイコンを使う事もできます!
アイコンの選択方法は後ほど。
今回は、縦横24pxの正方形「read-min.svg」を作成しましたので、以下のディレクトリにアップします。
/wp-content/themes/テーマ名/functions/gutenberg/icon/read-min.svg
アイコンの読み込み準備
アイコンは以下のcssファイルに記述します。
私は「custom-block.scss」に記述して、「style.min.css」としてコンパイルしています。
/wp-content/themes/テーマ名/functions/gutenberg/css/style.min.css
custom-block.scssの記述
後に、他のアイコンを楽に追加できるよう、scssの配列と@eachで記述しています。
クラスセレクター(クラス名)は基本自由ですが、先頭の「.dashicons-」は必須ですのでご注意ください。
$svg-icon-path: (
  "red-bg": "red-bg-min",
);
$icon-path: "/wp-content/themes/テーマ名/functions/gutenberg/icon/";

@each $icon-name, $icon-file in $svg-icon-path {
  .dashicons-svg-#{$icon-name} {
    background-image: url(#{$icon-path}#{$icon-file}.svg);
    background-repeat: no-repeat;
  }
}
style.min.cssの記述
scssがわからないよ!という方はこちら。
.dashicons-svg-red-bg {
  background-image: url(/wp-content/themes/テーマ名/functions/gutenberg/icon/red-bg-min.svg);
  background-repeat: no-repeat;
}
custom-block-add-style.jsの記述
custom-block-add-style.jsには以下のように記述して行きます。
(function () {
  var el = wp.element.createElement,
    blocks = wp.blocks,
    RichText = wp.editor.RichText;

  blocks.registerBlockType("my-plugin/sample-block01", {
    title: "赤い背景のブロック",
    icon: "svg-red-bg",
    category: "custom",
    description: "赤い背景のブロックを挿入します。",
    example: {},
    edit: function (props) {
      return el(
        "div",
        {
          className: "example-1",
          style: {
            backgroundColor: "#900",
            color: "#fff",
            padding: "1.4rem",
          },
        },
        el(RichText, {
          tagName: "span",
          className: "editable-text",
          value: props.attributes.content || "赤いテキスト",
          onChange: (newContent) =>
            props.setAttributes({ content: newContent }),
        })
      );
    },
    save: function (props) {
      return el(
        "div",
        {
          className: "example-1",
          style: {
            backgroundColor: "#008000",
            color: "#fff",
            padding: "1.4rem",
          },
        },
        el(RichText.Content, {
          tagName: "span",
          value: props.attributes.content,
        })
      );
    },
    attributes: {
      content: {
        type: "string",
        source: "text",
        selector: ".editable-text",
      },
    },
  });
})();
| title | ブロックに表示させる名称 |
| icon | style.min.cssで指定したクラスセレクタ ※.dashicons-は除く |
| category | 表示させるカテゴリー ここではcustomとしています。 詳細はこちら |
| description | プレビューの説明文 |
| example | プレビューに表示させるか否か。 |
| className | 付与されるクラスセレクター |
| style | 見た目の調整 styleを消して、cssで設定も可能です。 |
デフォルトで用意されているiconについて
これらのアイコンは、WordPressのデベロッパーサイトに用意されているアイコンを使う事もできます。
WordPressデベロッパーサイト(外部リンク)
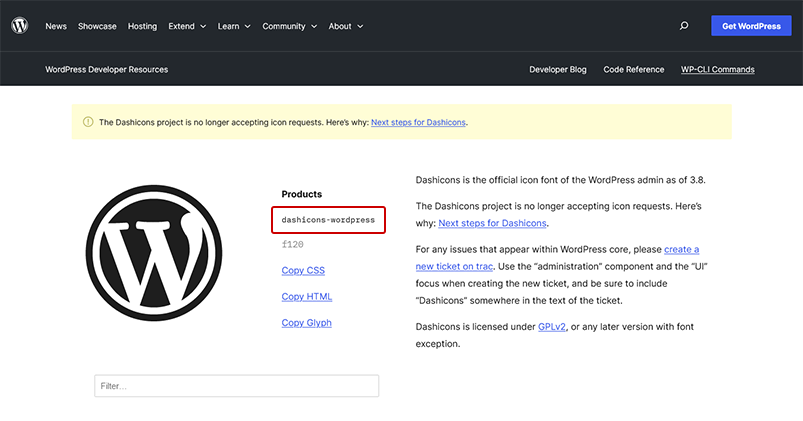
赤枠で囲っている箇所「dashicons-wordpress」より「wordpress」のみをコピーし、以下に貼り付けます。
(function () {
  var el = wp.element.createElement,
    blocks = wp.blocks;
  blocks.registerBlockType("my-plugin/sample-block01", {
    title: "赤い背景のブロック",
    icon: "wordpress", //ここ
    category: "custom",
    description: "赤い背景のブロックを挿入します。",
    example: {},

以下省略
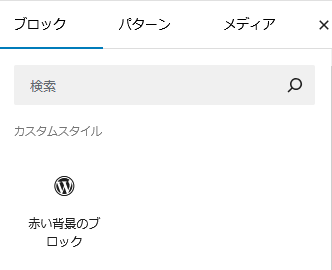
WordPressのロゴに変わりましたね!
カスタムスタイルブロックの準備のまとめ
この章では、以下のファイルにコードを書きました。
さあ、あともう一息!
style.min.cssの記述
.dashicons-svg-red-bg {
  background-image: url(/wp-content/themes/テーマ名/functions/gutenberg/icon/red-bg-min.svg);
  background-repeat: no-repeat;
}
custom-block-add-style.jsの記述
(function () {
  var el = wp.element.createElement,
    blocks = wp.blocks,
    RichText = wp.editor.RichText;

  blocks.registerBlockType("my-plugin/sample-block01", {
    title: "赤い背景のブロック",
    icon: "svg-red-bg",
    category: "custom",
    description: "赤い背景のブロックを挿入します。",
    example: {},
    edit: function (props) {
      return el(
        "div",
        {
          className: "example-1",
          style: {
            backgroundColor: "#900",
            color: "#fff",
            padding: "1.4rem",
          },
        },
        el(RichText, {
          tagName: "span",
          className: "editable-text",
          value: props.attributes.content || "赤いテキスト",
          onChange: (newContent) =>
            props.setAttributes({ content: newContent }),
        })
      );
    },
    save: function (props) {
      return el(
        "div",
        {
          className: "example-1",
          style: {
            backgroundColor: "#008000",
            color: "#fff",
            padding: "1.4rem",
          },
        },
        el(RichText.Content, {
          tagName: "span",
          value: props.attributes.content,
        })
      );
    },
    attributes: {
      content: {
        type: "string",
        source: "text",
        selector: ".editable-text",
      },
    },
  });
})();
表示確認
上記2つの工程でコードを入れサーバーにアップしたら、あとは表示調整のみとなります!
実際にブロックエディッタで表示すると以下のようになります。
「赤いテキスト」の箇所は自由に編集可能です。
ブロックエディッタ上の表示

こちらの表示調整は、「custom-block-add-style.js」のstyleの変更でも可能ですし、「className: “example-1”」のstyleを作って調整する事も可能です。
クラスセレクター名も自由で、ブロックエディッタ表示用とWebサイト側の表示用と同じ名前で作っておくと管理が楽かもしれませんね。
私は、scssでコンパイルしたcssをsingle.phpでも読み込んで使っています。
サイト側に出力されるソース
サイト側に表示されたソースを「開発ツール」で見てみましょう。
<div class="wp-block-my-plugin-sample-block01 example-1" style="background-color:#cc0000;color:#fff;padding:1.4rem">
    <span>
        赤いテキスト
    </span>
</div>
ここまでくれば、皆さんなら自由に調整できますよね?
まとめ
最後まで読んで頂きありがとうございます。
ブロックエディッタのカスタマイズに関する記事はいかがでしたでしょうか?
この記事ではhtmlとcssに関する箇所、Illustratorでオリジナルアイコンを作る箇所は省略しましたが、基本コピペで実装できるようにしてみました。
次回は、インライン要素のスタイルボタンを作ってみようと思います。
